Advanced Migration GBB
Welcome back to Part 4 of our Blog series. Thanks for taking the time to follow along. So? How did it go? Did you get through the whole thing with only one pass? I know I didn’t… 😉
Post-Deployment Shenanigans
Once you are done, you’ll have a bunch of new elements within your Resource Group. Here’s an idea of what it should look like:

The HCICluster element is your main player from now on. He’s got all the goods on the nodes, storage, and where you can go to get monitoring info and performance stats. There are a few things to do here so let’s click on him and go for a tour!

Go into Windows Admin Center and deploy the Admin Center Extension to enable that feature. Super handy for cluster management, real time reporting metrics, and networking/storage config. It will take a while for it to deploy the Extensions and enable the feature.

Next lets go back to the main Cluster blade and select VM Images. VM Images is the local repository for VM disk images we want to deploy from on the HCI Cluster.

Now we want to select Add VM Image. Here we can add Images from several places. The most common is the Marketplace, but if you have custom images in your Azure environment or on a local file share you can add those here too. Just remember these images need to be compatible with Azure to be useful. You can always pull-down one from the Marketplace and customize it for your needs then save that for reuse.

After you’ve added a few images to the system, say Windows Server 2022 Azure edition and Windows 11 with M365 from the Azure Marketplace they will show as images you can select in the VM deployment flow.
After adding the images and letting the rest of the deployments complete, you should now be able to connect to Windows Admin Center. Let’s go there and click Connect. Once the “WAC” interface loads up navigate down the left-hand side to the Network ATC option and Click on Deploy Network ATC Network HUD. This lets us see and manipulate the Network Intents we defined when we deployed. This will take a few seconds but once done you should see all the network interfaces and intents they are deployed on:

Ensure that the proper interfaces are matching the correct intent on the servers. Also, make note of the Compute Virtual Switch name for later!

Next, I go into the cluster Settings then to Storage Spaces and pools and I select Thin for the default provisioning type. This will reduce the storage consumption on the S2D Volumes for the VMs deployed.
Finally, I’ll check the Updates area on the cluster, and Enable Cluster Aware Updating. Once I’m finished up in here, I’ll drop back to the main HCI Cluster Blade and leave WAC.
Now, select Logical Networks on the left-hand side and define one. On my home network, I have a predefined DHCP scope deployed already so I selected that to be my network in the HCI environment.

Very quick to setup a DHCP Logical Network. Nothing to enter! Except! That Virtual switch name from WAC – Network Intents page, yes the whole weird thing the deployment named it. Some of the services you can deploy onto your new HCI environment do require a DHCP Logical Network.
Next, go down to the Operations section and select Updates

If when you get into the Azure Update Manager area, there are no pending updates then you’re done! It will look something like this:

If however, it looks like this:

Then you select One-time update and step through the wizard to complete the install.

Here we have a completed monthly update of the system.
After you’ve run through and completed the updates to the system, you’re done with the Day 1 and 2 activities to deploy the Azure Stack HCI solution. Woohoo! Now we can start deploying VMs and Services onto the cluster!
Deploying AVD on HCI
We’ve had a “bit” of work getting here, but our cluster is now humming along and ready to accept Azure services! You can deploy regular VMs, AKS on HCI, and AVD on HCI right out of the box with some minor config. Arc enabled services can be layered on top of AKS for PaaS DB, App, AI/ML solutions as well.
Given that I work with AVD on a regular basis, I thought I’d cover what that deployment experience is like with the HCI. Azure Stack HCI can run the host pool for the Azure Virtual Desktop solution. One critical point to make here is the control place for AVD is still hosted in Azure. You can however use RDP Shortpath to have local users direct connect to the session host over UDP on HCI after authentication and authorization through the AVD control plane in Azure.
There are a few prerequisites here to point out that are important to understanding how AVD on Azure Stack HCI runs:
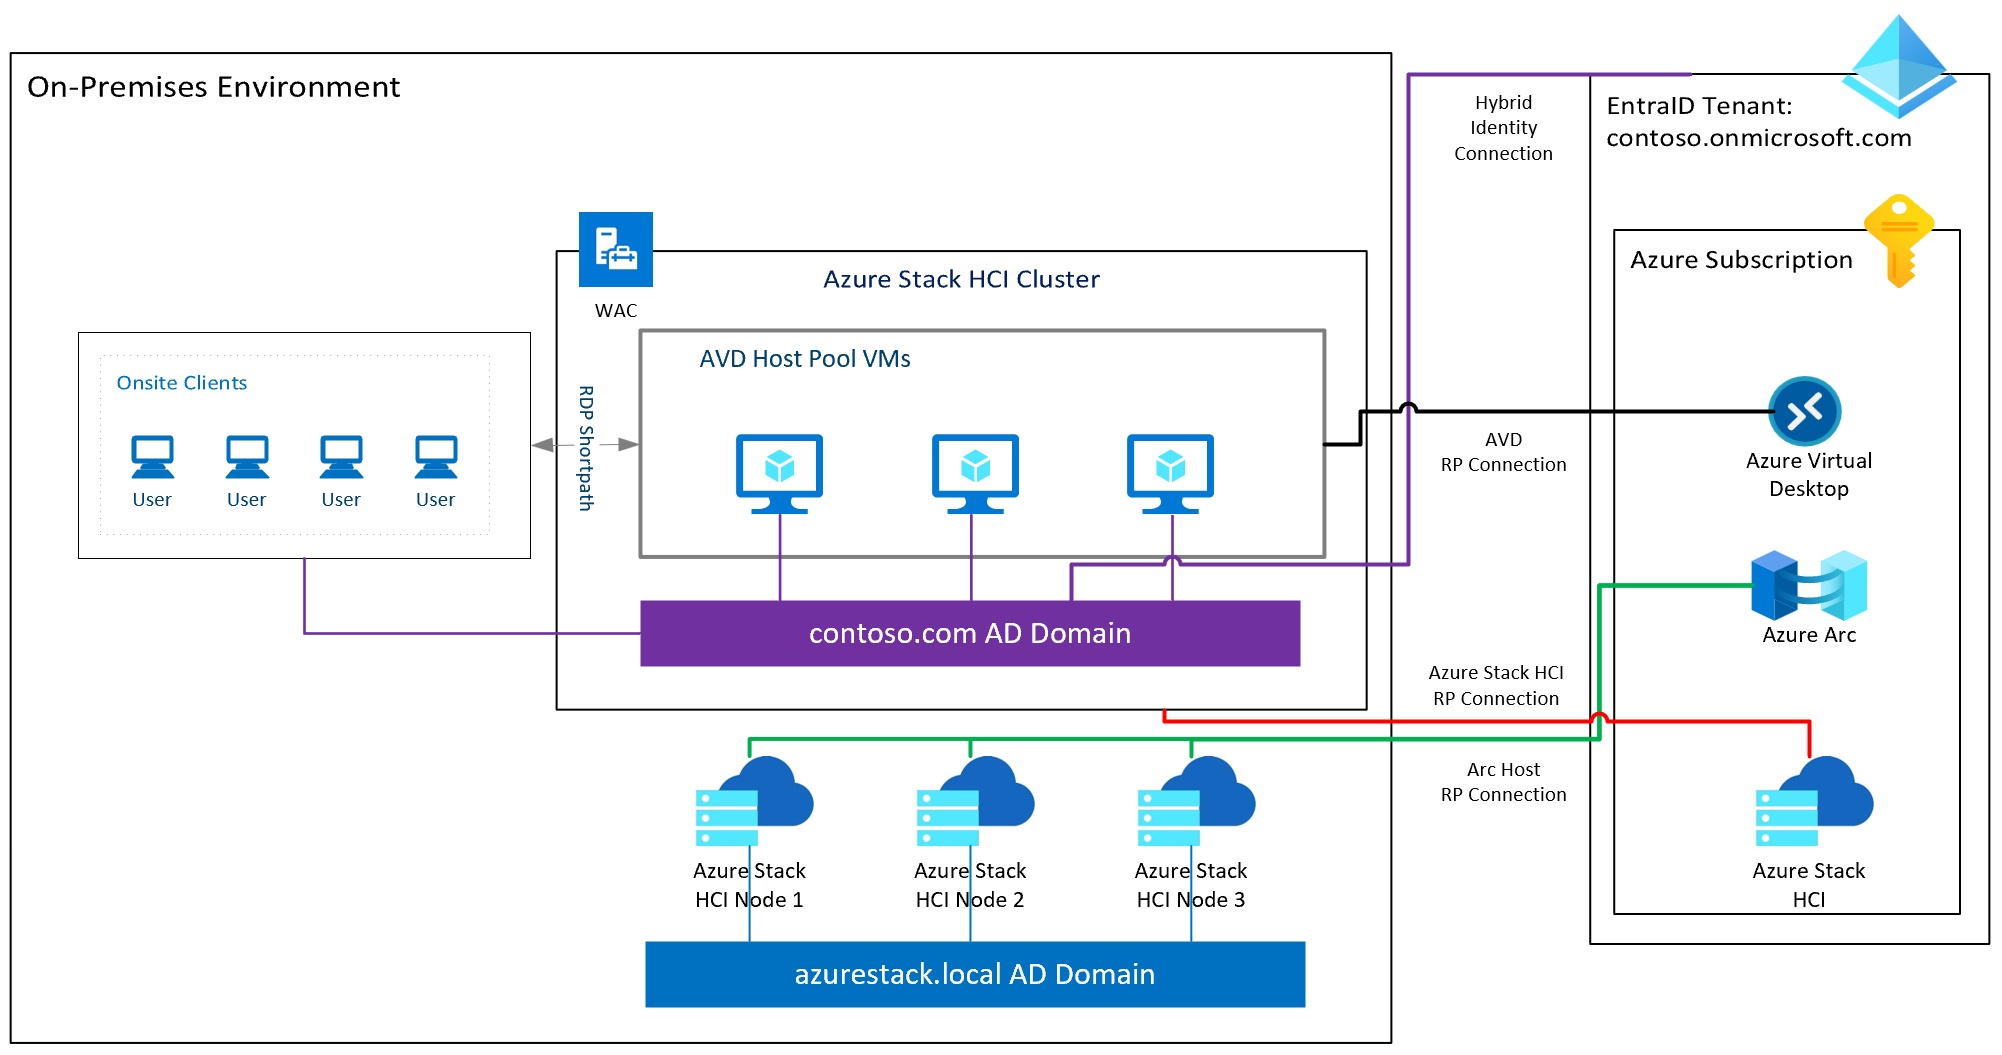
- You need a Hybrid Identity Setup with EntraID federated to your on-prem host pool AD environment. Today, AVD on HCI doesn’t support EntraID Only joined domain hosts. However, if you remember all the way back at the beginning where I proposed the idea of a Fabric Identity, you aren’t limited to the domain used to deploy HCI. As I mentioned then, the HCI cluster identity and the workload identity can be separate domains. So, your user identity space can be the one you deploy with AVD.
- Azure Stack HCI and the AVD Host Pool must be registered within the same EntraID tenant. I know this will be confusing based on the first one but hang with me. Azure Arc underpins all of this, and Arc resources can be registered with ANY EntraID tenant. The local identity and the cloud identity are separate things with Azure Arc. So, while your local HCI cluster might be on azurestack.local AD domain, and your users might be on contoso.com. Your EntraID cloud identity domain might need to be hybrid joined to contoso.com, if that’s your User domain. The azurestack.local isn’t connected to anything at all, but we have registered the HCI hosts into Azure Arc within an EntraID tenant. Your AVD Host Pool that gets deployed onto the target cluster needs to be in the same Tenant of contoso.onmicrosoft.com and in the same subscription.
See this graphic below to help illustrate:

Here you can see your AVD Host Pool VMs are connected into the AD Domain contoso.com which is Hybrid Connected to EntraID tenant contoso.onmicrosoft.com. Your HCI nodes are connected into azurestack.local AD domain and are also registered into your subscription under contoso.onmicrosoft.com EntraID Tenant as well. Now, you don’t have to deploy it this way. Your Fabric domain and User Domain can be the same. But if you need this level of sophistication, it’s possible.
- You need to have a Windows Server 2022 or Windows 10/11 Image deployed to the HCI cluster to deploy the Session Host Pool. (Remember from above?)
- You need to deploy a Logical Network with DHCP to create session hosts today. (We did this one too!)
You can verify that your HCI Cluster is prepared and meets the AVD Requirements by going to the HCI Cluster element in the Portal and looking under the Getting Started section.

If you have the green check mark, you’re good to go. (Provided you’ve connected the workload/user identity domain to EntraID as explained above, this checker won’t validate that given the complexity.) If you have a red X, then click on the hyperlink and see what you’re missing.
Let’s select Deploy to go to the AVD Host Pool deployment wizard. It will open a new browser window and authenticate you.
Right away you’ll see that the deployment experience for AVD on HCI is the same as any Host Pool creation flow.

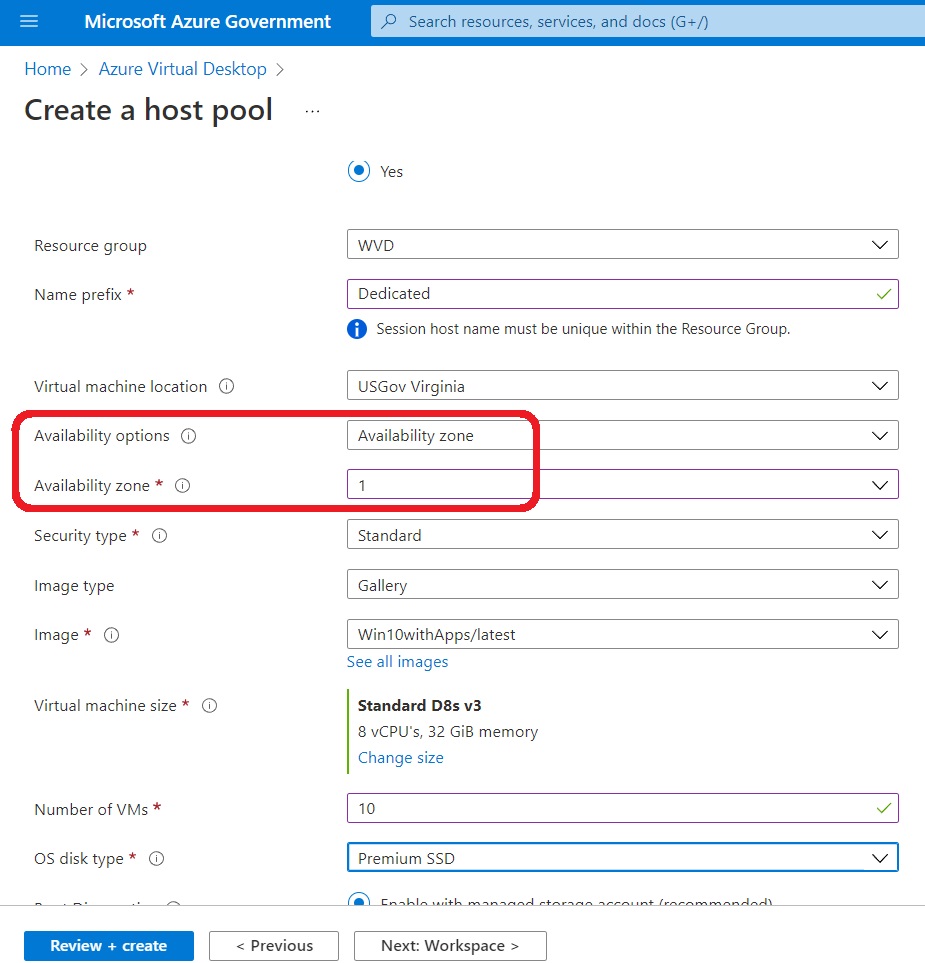
Select the relevant parameters for your environment and then select Next: Virtual Machines
This part of the deployment is where we diverge from a standard AVD deployment. Select the radio button to “Add virtual machines” Yes.

Complete the rest of the required information to perform an Azure Stack HCI deployment by making selections and scrolling to the bottom of the screen:
- Give the VMs a Prefix name: IE AVD, POOL, etc…
- Tick the radio button for Azure Stack HCI virtual machine
- Select the HCI Cluster Customer Location
- Select an Image (or if you didn’t add one yet, add one!)
- Specify the VM configuration you want on the HCI cluster and the number of VMs to deploy.
- It’s worth pausing here to mention this will impact cost. VMs are meter at .01 per vCPU per hour or 7.30/month roughly. So for the example below that has 3 VMs with 4 vCPUs per, it’s almost $90/Month at list price.
- Also, if you’d like to make your life easy, line up the VM config to Azure based VMs from the same CPU family. It will help with performance expectations of your users. Below that’s roughly a D4s v3 with the Broadwell based gear I’m deploying onto.
- Specify the Logical Network you defined with DHCP previously. (You did that right?)

- Provide the Active Directory environment you want the HCI VMs to join. Remember no EntraID only!
- The User Account needs to be able to connect to domain and add systems.
- The DHCP scope needs to refer to the proper DNS for the Domain to reach it.
- If you want to specific the OU to drop the hosts into that information it needs to be in the proper format without “quotes”.
- Finally define the local admin information for the VMs with a password and click Next: Workspace

Here click, the radio button to add the VMs into a default desktop application group, then either create a workspace or select an existing one. Once done, click Next: Advanced at the bottom.
Enable diagnostics if you like and select a workspace to send the data if you so choose. Then click Next: Tags to continue.
Add relevant tags and information here for the resources the deployment wizard will create if needed. Then finally click Review + create.

The validation should come back good if you’ve provided all the required information. This process will take a while. Don’t forget to download the template should you need to redeploy or add it to your Automation workflows for the future!
The deployment might fail due to resource constraints, missing or incorrect domain information, and exhausted DHCP scope, missing DNS info for the VMs to pick up domain info. Point being there may be some troubleshooting to get a successful deployment. Give it a few tries, dig into the logs and generally bang it out.
Once Azure Resource Manager notifies you the deployment is complete, you should see the VMs under the HCI VM list:

And the AVD Control Plane within Host Pools:

Here you can see I have two Hosts running on my cluster and they show in the AVD Host Pool. They are deployed to my Fabric Identity. I’m only using this for testing and due to the quirk of me deploying into a Microsoft Corporate tenant, I can’t actually Hybrid connect to the EntraID tenant. So, this is good to see the deployment workflow functions, but otherwise may not be representative of your environment requirements.
From here, you also can go through the process of deploying the Remote Desktop App or the Windows App from the Microsoft Store. The Windows App is the new unified client for all RDP connections.

Once you download it, just sign into the App with the EntraID connected to the Host Pool environment and you’ll see the Workspace assigned with the Desktop or published RemoteApps.

That’s all you have to do to start hosting the AVD workload on Azure Stack HCI!
Final Thoughts
We’ve reached the end of this series. We built an environment from the ground up and deployed a workload to the on-prem cluster. There is a lot more you can test and validate outside of the AVD on HCI solution with Azure Stack HCI.
Here are a few thoughts around cost optimizations with Azure Stack HCI in a Test/Dev environment. While Azure Stack HCI has an entitlement to use Azure Hybrid Use Benefit to exchanging physical cores of Windows Server Datacenter licensing with SA and for Azure Stack HCI consumption-based cores. It isn’t always efficient to use that on an environment like this. You do have a 60 day free trial from the time you register the cluster. You also have the ability to join the Preview Channel for the HCI system builds to get the latest versions. Since Preview Channel systems can’t be used in production, and these nodes aren’t production ready either give the old/obsolete nature of the gear, those two seem to pair up nicely. I won’t go into the workload licensing here as that too still needs to be entitled, but you have a few options to run this solution for a while and kick the tires. Then decomm it again or recycle it as you see fit. If you’ve collected all your work, you can even replay that on more gear later or get a jump start on a production build working with your OEM of choice. (You DO remember you can’t run this in production, right?)
I hope that you found this blog series helpful and insightful on how to stand-up Azure Stack HCI and get a service deployed. It’s several hours of work to roll your own HCI environment, but you’ll have a nice understanding of the fundamentals and a greater appreciation of all the work that went into the automated HCIBox virtual environment we’ve built into the portal. There are plenty of OEM solution offers to leverage once you’re ready to scale. Having a test environment like what we built will help you clear the path on all the environmental challenges to operationalize Azure Stack HCI.
Which brings us back to the beginning. If all this work doesn’t seem worthwhile, you can always leverage the other test/deployment methods available for HCI. You can and should work with an OEM to get a cluster environment with services for your initial deployment. This blog series is for when all of the other paths won’t meet your use case, budget, timeline. I want to again thank all of those who helped to put this together. Whether that was excellent existing documentation, sorely needed collaboration building my environment, or outstanding peer review of the posts. Thanks to: Michael Godfrey, Thomas Maurer, Flo Fox, and Kevin Sullivan I couldn’t have done this without them!
And thank you so much for choosing to spend your time here!