Azure Virtual Desktop by default will provision up VMs based on a number of different “availability” options, but the AVD blades in the Azure Portal do not support deploying VMs to dedicated hosts.
Compute Isolation (and use of a dedicated host) may be important to meet regulatory requirements, including meeting isolation guidelines to meet DoD IL5 requirements.
This post is intended to provide you with a path to using dedicated hosts with AVD, and will walk through a portal-based deployment, that we will update to use dedicated hosts.
First Step: Deploy AVD VMs
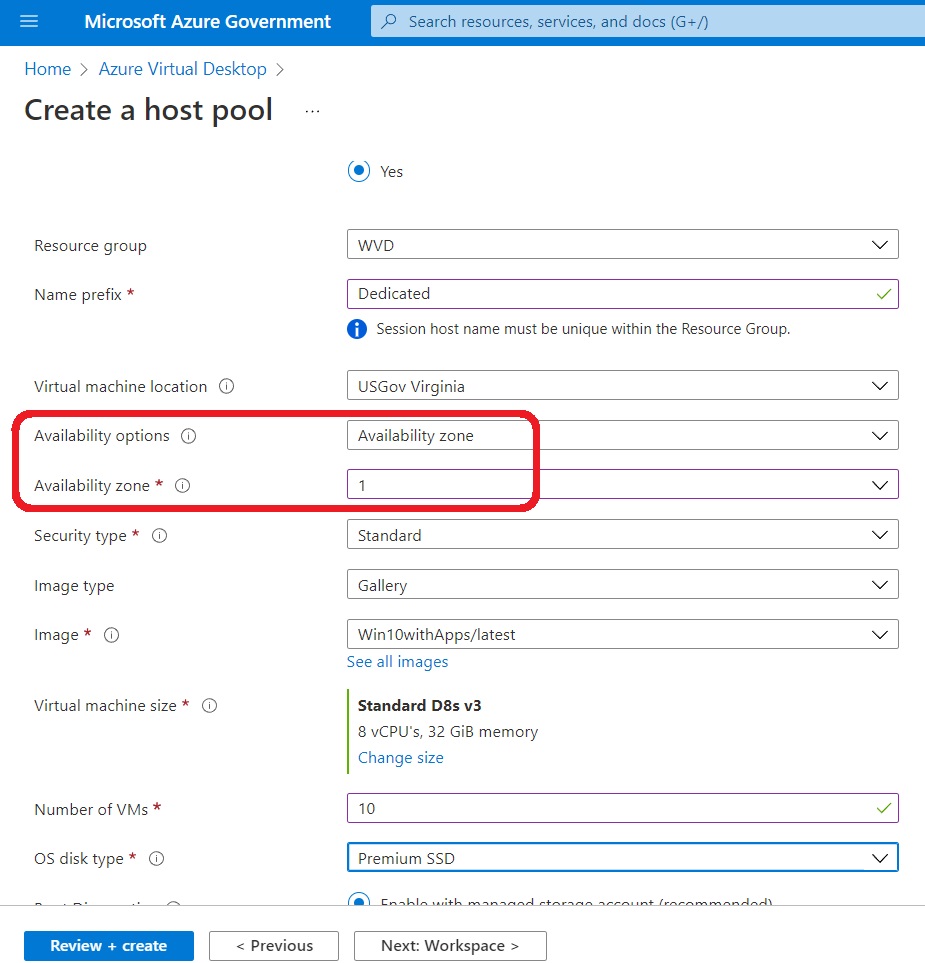
Provisioning the VMs in your AVD pool will be similar to other portal-based deployment, but with attention paid to the availability options. Walking through the portal, we will create our host pool:

Then create our VMs… BUT NOT SO FAST!
We want to pay attention to the “Availability Options”.
In order to later move our VMs to a dedicated host, the VMs have to be deployed in the same “Availability zone” (Azure data center within the region) as our Dedicated host.
For my deployment, I’ve deployed my VMs to Availability zone 1:
Once my VMs are all deployed (took about 10 minutes for the 10 8-core VMs), we can work on moving them to a dedicated host:

Second Step: Getting Dedicated Hosts
Dedicated hosts are managed in groups of similar physical hosts via host groups.
You can certainly create a host group and request / add a host through the portal, but I’m going to do it all via PowerShell (makes it easier to move the VMs later!).
I’m going to start fresh without a Host group or any hosts for dedicated compute:
I’ll run a little bit of PowerShell to create my host group and a single dedicated host, and the way I’ve built my PowerShell, I only need to set a handful of variables / parameters for the whole process (including the VM moves):
#################################
# Azure Settings & other parms
#################################
$ResourceGroup       = "WVD"
$SubscriptionID      = "11111111-1111-1111-1111-111111111111"
$HostPoolName        = "Dedicated"
$Location            = "USGov Virginia"
$HostGroupName       = "AVD"
$HostCount           = 1
$Zone                    = 1
$HostSKU             = "DSv3-Type3"
The variables are largely self-explanatory for Azure / AVD, but I want to highlight the $zone, which is the availability zone (Azure data center) where we want our host (and have our AVD VMs!), as well as the $HostSKU. The $HostSKU is the actual type of host I want in my Host Group – you can find the available hosts for your target region on the Azure Dedicated Host pricing page.
Note that the page ALSO has important details about the hosts, like the number cores, RAM, processor details… which is all very useful in selecting your physical host.
NOTE THAT: the hosts have names similar to the VMs available in Azure – and that is SUPER IMPORTANT!
The hosts you select must be compatible with the VMs you want to deploy (or move) to them!
In my case, I created D8s V3 VMs in the pool, and I deployed 10 of them (for a total of 80 cores of compute). In order to be efficient with my compute I’m going to pick a “D” series host with 80 cores of available compute… so all my VMs can fit on one host – that would be the “DSv3-Type3” that I’ve put into the $HostSKU variable.
There may be a little more work I need to do to run my code against Azure, like making sure I have the AVD module, as well as actually connect to my Azure environment (and select the proper subscription – all that stuff is below, just before I create my host group:
#################################
#Step 0 - Install AVD Module... in case you don't have it

#################################

# Install-Module -Name Az.DesktopVirtualization

#################################

#Step 1 - Connect to Azure Gov and get started

#################################

Connect-AzAccount -EnvironmentName AzureUSGovernment Select-AzSubscription -SubscriptionId $SubscriptionID

################################# # Create Host Group for Dedicated Hosts

#  https://docs.microsoft.com/en-us/azure/virtual-machines/windows/dedicated-hosts-powershell #################################

$hostGroup = New-AzHostGroup -Location $Location -Name $HostGroupName -PlatformFaultDomain 1 -ResourceGroupName $ResourceGroup -SupportAutomaticPlacement $true -Zone $Zone
Once the host group is created, I can request and add my physical host(s) – I’ve done it in a loop, but I’m only actually going to request a single host (based on the $HostCount variable earlier).
#################################
# Create Dedicated Hosts
#     https://docs.microsoft.com/en-us/azure/virtual-machines/windows/dedicated-hosts-powershell

#################################

$Hosts = 0

while($Hosts -lt $HostCount)

{

   $HostName = $HostGroupName+"-"+$Hosts

    Write-Host $HostName

    $dedicatedHost = New-AzHost -HostGroupName $hostGroup.Name -Location $location -Name $HostName -ResourceGroupName $ResourceGroup -Sku $HostSKU -AutoReplaceOnFailure 1 -PlatformFaultDomain 0 -LicenseType WindowsServerPerpetual

    # Set license type for AHUB to match entitlement for AVD

    $Hosts++

}
Here’s an image of all that PowerShell actually running:

Now I have my host group, and my dedicated host with no VMs running on it:

Details for the host group are below, as well as showing the single host assigned:
Step Three: Move the VMs to the Dedicated Host(s)
I’ve got some more code to run which will loop through all the VMs in the host pool I provisioned earlier, which will move the VMs one by one to the dedicated host:

#################################
#Move VMs to New Hosts
#################################
$myDH = Get-AzHost -HostGroupName $HostGroupName -ResourceGroupName $ResourceGroup -Name $HostName
$VMs = Get-AZWVDSessionHost -ResourceGroupName $ResourceGroup -HostPoolName $HostPoolName
Foreach ($VM in $VMs) {
                    $DNSname = $VM.name.split("/")[1]
                    $VMname = $DNSname.split(".")[0]
                    $myVM = Get-AzVM -ResourceGroupName $ResourceGroup -Name $VMname
                    $myVM.Host = New-Object Microsoft.Azure.Management.Compute.Models.SubResource
                    $myVM.Host.Id = $myDH.Id
                    Stop-AzVM -ResourceGroupName $ResourceGroup -Name $VMname -Force
                    Update-AzVM -ResourceGroupName $ResourceGroup -VM $myVM
                    Start-AzVM -ResourceGroupName $ResourceGroup -Name $VMName
}
There was some string manipulation (splitting) I needed to do on the VM name to get the parameters right. Rather than do it all in one line, I thought I’d make it simpler to understand, as well as show the transformation (if you are interested):

The “loop” took a while to run, since it needed to change each VMs config in a big way:
- stop each VM
- update (move) each VM to the host
- Start each VM
While it was running (towards the end) I could see the capacity on the dedicated host go down as VMs were assigned:

…it lets you know the remaining capacity on the host while it goes:

Hope that was a useful walkthrough!
-John