Advanced Migration GBB
Welcome to Part 3 of this series of Rolling your own Azure Stack HCI environment! Congrats and thanks for sticking with me. Today is the day! We’re finally here. Now we get to load some code and make this HCI “thing” happen.
Let’s review what you should have done at this point.
- We’ve prepped the hardware with the latest firmware.
- We’ve collected and injected drivers into the 23H2 HCI build.
- We’ve created/prepped the on-prem and cloud identity space, rights assignments, and users.
That’s a lot, it isn’t a trivial amount of work and lays the foundation for a straightforward installation process. Well, as straightforward as it can be using unapproved hardware for a Dev/Test solution environment. 🙂
The steps here are the same-ish as what you did to install Windows Server 2022.
- Power off the systems
- Insert your USB Key with HCI on it into the USB port
- Power on the system and one time boot to the USB key
- Tell the setup process to install the HCI image
- Selecting “Custom” install process so we can clean the drives
- Delete all the existing partitions on the OS drive and select “New”
- Continue the install process
- Wait…
- Wait Some more
- Set a local Administrator password across the systems – (Be mindful of Complexity Requirements)
- Then boot into Sconfig for a few more changes
You’ll be greeted by this lovely screen when you drop into the “Desktop” on the HCI server:

- When we get here, go into 2 and set the proper node name. When it asks to reboot, say no.
- Then go into 8 and verify you have IP information if you’re running DHCP (which you should have a scope for on your network). Set the Static IP and DNS Server of your Domain Controller here.
- Go into 9 and verify a time source. It should match your domain controller.
- I then do other housekeeping for the systems:
- Enable RDP
- Enable Required Telemetry
- Then go into 6 and Install All Quality Updates
- Once the updates are done, you’ll reboot and rerun the updates. There may be driver updates in here too.
When the system stops installing updates and requiring a reboot, you have a few options here based on what you know of your hardware. You can select 15 and drop into the command line, navigate to your driver folder on the USB key and load any additional software or drivers that didn’t slipstream. If you’re not sure, you can load up a Windows Admin Center instance and import the servers with the Administrator user account on the system, then go into Devices to see if there are any “Unknown” devices without drivers in the list. This is like going into the Device Manager on a regular Windows system. It also only takes a few minutes to setup. Then use the PowerShell interface within Windows Admin Center to load up the additional software and drivers.
On my system I needed to install the iLo Drivers and config software for the OS to correctly interface with the hardware. Other OEMs have similar requirements with Dell/EMC, Lenovo, Cisco, DataOn, Intel etc.
Once you’re done with these steps, you should replay the work on any other nodes in the same order to get the same end result. You can do all this work in the OOB interface, RDP, or WAC. Whatever makes you feel comfortable.
Depending on how many interfaces you’ve connected and plan to provision, what you plan to use on the system, and what it was used for before, there are a few side quests you may need to complete.
- Clean Your Disks: As mentioned previously we need data disks for this to work. Mine were used in a vSAN configuration and I needed to clean them to use with S2D. You’ll need to remove any removable media from the system first. Here is a script to run on each node:
Update-StorageProviderCache

    Get-StoragePool | ? IsPrimordial -eq $false | Set-StoragePool -IsReadOnly:$false -ErrorAction SilentlyContinue

    Get-StoragePool | ? IsPrimordial -eq $false | Get-VirtualDisk | Remove-VirtualDisk -Confirm:$false -ErrorAction SilentlyContinue

    Get-StoragePool | ? IsPrimordial -eq $false | Remove-StoragePool -Confirm:$false -ErrorAction SilentlyContinue

    Get-PhysicalDisk | Reset-PhysicalDisk -ErrorAction SilentlyContinue

    Get-Disk | ? Number -ne $null | ? IsBoot -ne $true | ? IsSystem -ne $true | ? PartitionStyle -ne RAW | % {

        $_ | Set-Disk -isoffline:$false

        $_ | Set-Disk -isreadonly:$false

        $_ | Clear-Disk -RemoveData -RemoveOEM -Confirm:$false

        $_ | Set-Disk -isreadonly:$true

        $_ | Set-Disk -isoffline:$true

    }

Get-Disk | Where Number -Ne $Null | Where IsBoot -Ne $True | Where IsSystem -Ne $True | Where PartitionStyle -Eq RAW | Group -NoElement -Property FriendlyName- Config the NICs: If you’re using more than one Interface card for your VM/Management traffic, which is pretty standard, you’ll need to disable DHCP on the other interfaces and remove the gateway. Here is some code to do that:
Set-NetIPInterface -DHCP Disabled -InterfaceAlias "Nic-Name"

Remove-NetIPAddress -InterfaceAlias "Nic-Name" -Confirm:$false

Remove-NetRoute -InterfaceAlias "Nic-Name" -NextHop 192.168.0.1 -Confirm:$false
You’ll need to set the interface names and “-NextHop” address to the correct ones for your interfaces/network.
After you get done here, it’s worth looking over your work and making sure you’ve got everything squared away. Before the next few steps. Everything should be up to date on HCI, drivers deployed, IP’ed, Network Interfaces properly connected/configured, Disks prepped. If you’re doing a switchless configuration, make sure your ethernet or DAC cables are connected to the same interface and port on both sides; Port 1 to Port 1, Port 2 to Port 2.
You’ll want to deploy the Server Roles for HCI and reboot:
Enable-WindowsOptionalFeature -Online -FeatureName Microsoft-Hyper-V -All -NoRestart

Restart-Computer -Force
We’ve now got all the nodes ready to join the team and work for Azure! Woohoo! There is an onboarding script that you can use below. Replace the sample information with your own for the variables.
$rg="TheRGNameYouCreated"

$AzureSubID = "TheAzureSubscriptionGUIDYoureUsing"

$tenant="YourAADEntraIDTenantGUID"

Write-Host "Installing Required Modules"

Set-PSRepository -Name PSGallery -InstallationPolicy Trusted

$ModuleNames="AzSHCI.ARCInstaller","Az.Resources","Az.Accounts","AzStackHci.EnvironmentChecker"

    foreach ($ModuleName in $ModuleNames){

        if (!(Get-InstalledModule -Name $ModuleName -ErrorAction Ignore)){

            Install-Module -Name $ModuleName -Force

        }

    }

Connect-AzAccount -SubscriptionId $AzureSubID -TenantId $tenant

$armtoken = (Get-AzAccessToken).token

$id = (Get-AzContext).Account.Id

Write-Output "Initializing & Registering Azure Stack HCI Arc Agent on Node"

Invoke-AzStackHciArcInitialization -SubscriptionID $AzureSubID -ResourceGroup $rg -TenantID $tenant -Region EastUS -Cloud "AzureCloud" -ArmAccessToken $armtoken -AccountID $id -Force
You’ll be prompted to sign-in to a system that has access to a browser and provide the device code. Good to do this step through RDP to copy/paste or in WAC. You’ll see a bunch of code scroll by and the systems will be connected to Azure through the Arc agent.
Once complete, Let’s verify the config and the hardware before finishing the local side of the config. Run:
Invoke-AzStackHciHardwareValidationLook for any errors in the system setup and follow the information in the error to resolve the issue.
We’re now done with the nodes local configuration everything else can be done through Azure! Please note that if you purchase an Azure Stack HCI system from an OEM, all of this work is done for you. They’ll also walk you through the Azure and AD prep steps.
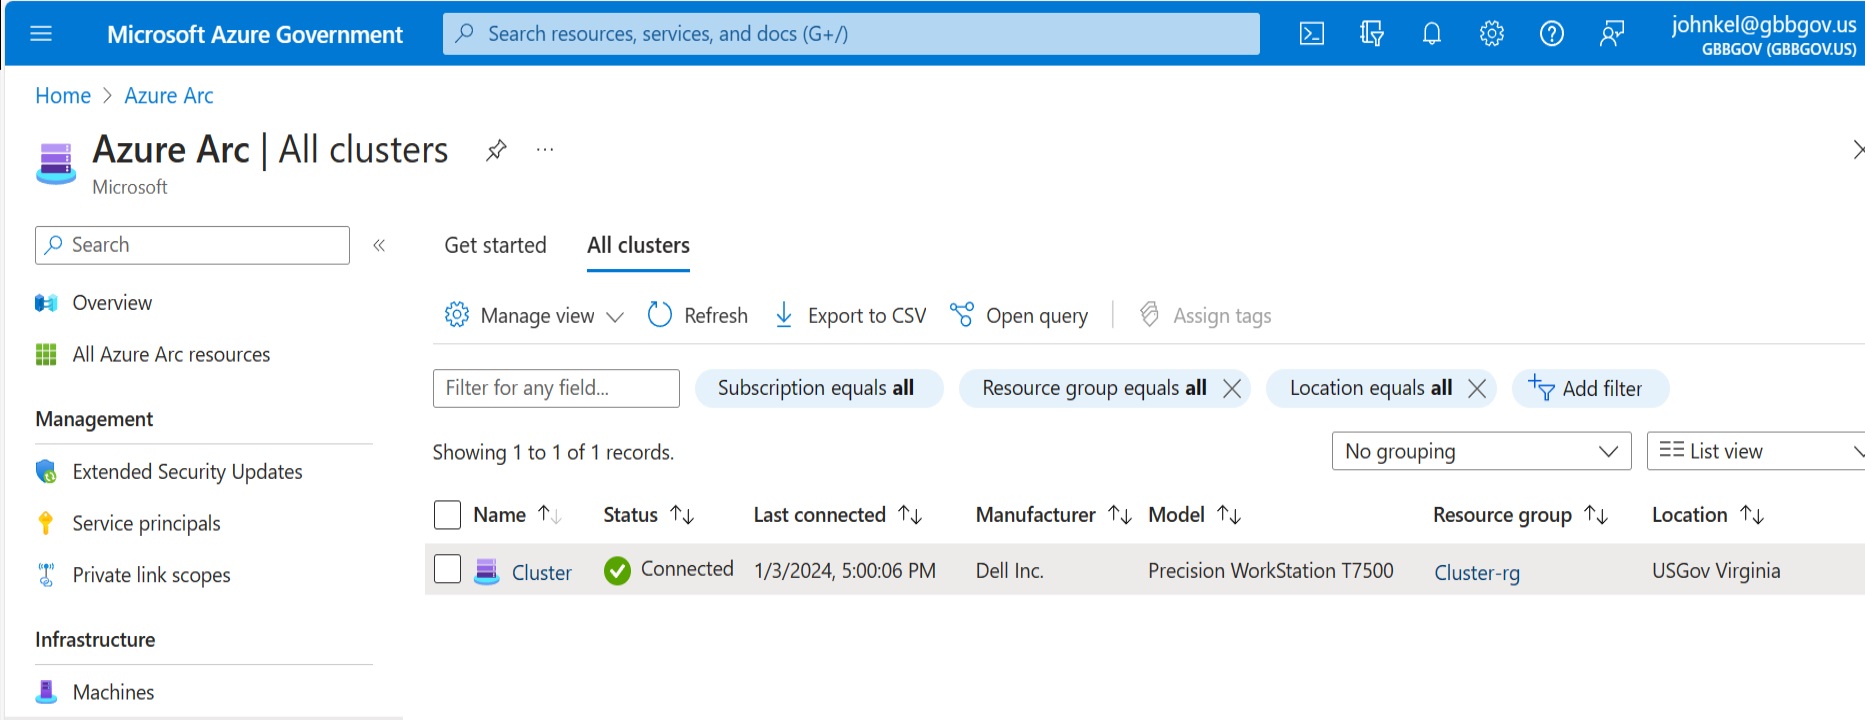
In the Azure Portal, search for Azure Stack HCI and select it like we did before.

This time we want to select “Deploy Cluster” on the HCI landing page.

Now we’ll land on the deployment wizard for Azure Stack HCI 23H2. It’s all portal driven and will then direct the Arc connected HCI nodes to complete the cluster build. You should see your Arc connected HCI nodes at the bottom. If you don’t, then they didn’t register correctly, or you tried to deploy and the need to clean up the install.

In the next set of steps, you’ll set and specify a bunch of information that was outlined during the planning and identity phase of this series. Remember when I said it would be a good idea to write things down? Yeah, this is where it gets used. Ensure you have the correct nodes and the right number of nodes before continuing. All of your information you enter is critically important, but the process is also forgiving.
Tip: If there is a circled “i” next to a field, hover over it or click it to reveal the field tip. These can either be not helpful or very helpful to make sure you enter the information correctly. I always click on them the first time through a wizard like this.

You should define a new Key Vault, Storage Account, and anything else that requires new/other Azure services. You’re going to setup the Network Intents here with the interface mapping. You’ll want to set any VLAN IDs you might need for the networks like storage or VM traffic. You’ll need that block of IPs we were discussing before to deploy the clusters and configure the services we’ll run on HCI.

You need the Local Admin information, the Domain Information, and the User Account you had the AD Prep tool create in the previous blog. The OU info needs to be in the same format from the AD Prep tool.

The final set of steps relates to security recommendations (good to accept the defaults if you can), storage config (let it create the recommended volumes if the config is typical), and tags (Tagging the environment will help with locating resources).
Finally, the wizard will check your work for any errors:

And then click Start Validation to run checks on the systems to ensure it can deploy properly.

If at this step it runs into issues it will give you “Go Do’s” to correct before continuing. If you do get an error, the system will allow you to revalidate.
Finally, you’ll be given the option to “Review + Create” where it will start the cluster build. It will also allow you to save the ARM template of the deployment for you to replay or create a template from for future deployments.
The deployment WILL take a while. Up to 2-3 hours for a two-node cluster. So let it do its thing. You can monitor the deployment from the final step which will take you to the deployments section of the HCICluster element:

If at any point it fails, you can Rerun deployment to pick up where you left off.
This is a good place to pause for now. Get the Cluster up and running address anything that comes up like typos and any issues. I had a permission issue from not getting the rights correct on the Domain User account, entering the OU structure incorrectly, along with the User information being formatted incorrectly my first time through. It’s important to pay attention to the sample information that is provided and the field tips.
Once you clear all of those common errors, you’ll be able to move on the next set of steps to get this turned up! I want to say thanks again to Michael Godfrey for the scripting samples here. Thanks for reading!